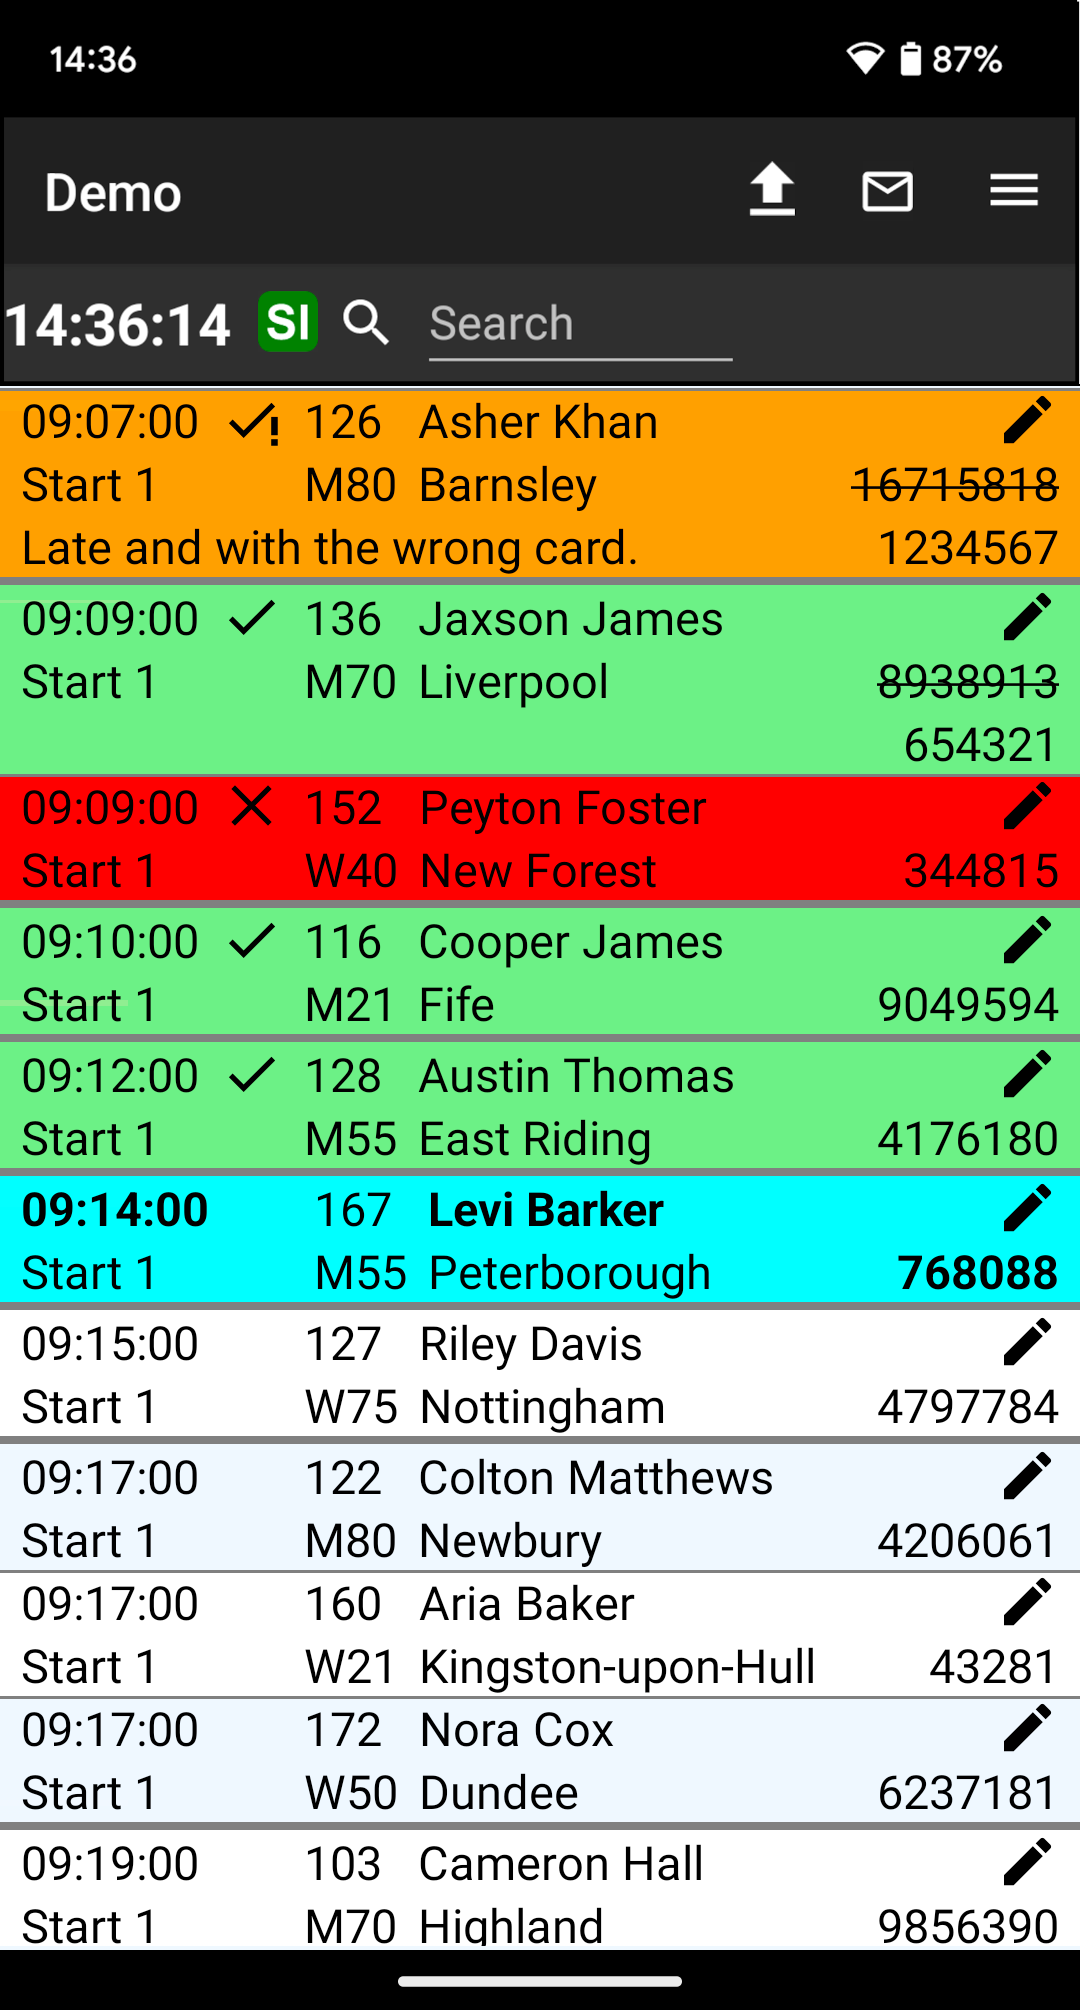
Main screen
Start window
The Start window highlights the participants that are due for tick off.
It is a sliding time window, which moves forward as time passes on.
Participants are entering the window, being ticked off (or DNS), and then, leaving the window.
Manual tick off
Tap on a participant to change his/her status:
- First tap: Started (green).
- Second tap: DNS (did not start, red).
- Third tap: Late start (orange).
- Fourth tap: Return to initial state (uncoloured).
Late start denotes a participant that was initially ticked off as DNS but has later shown up.
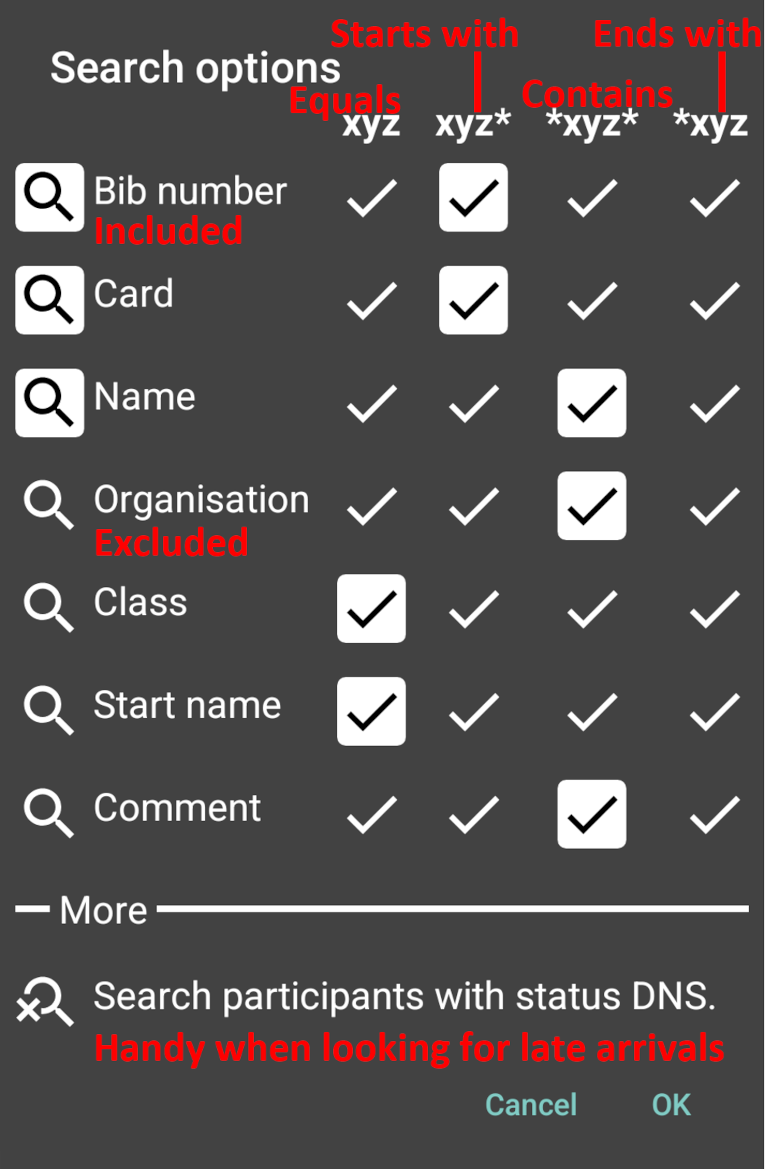
Search
Search for participants by entering free text. Tap the search symbol in the main screen to customise
the search options:
- Fields can be included in or excluded from the search.
- The matching criteria can be specified.
Automated tick off
When the participant inserts the card into the SPORTident station, the card number is checked and
the participant is automatically ticked off. Optionally, the card is also checked to be cleared (which takes 1–2 sec of extra time).
If the inserted card does not match any participant, a list of candidates is displayed. Candidates are:
- Participants who are within the start window and have not been ticked off (on time but with wrong card).
- Participants with status DNS (late with wrong card).
Select one of the candidates to change status to Started (or, Late start) with a new card number.
Other options:

Copy card saves the card number, which can then be pasted when editing a participant.

Manually create a New participant with this card number. This feature has to be enabled in the Settings.
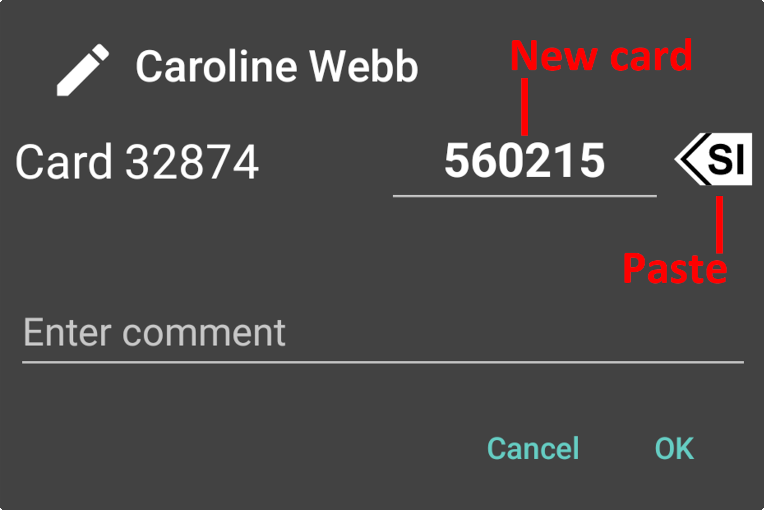
Edit participant
Change the card number:
- Manually enter the new card number.
- Paste the card number that did not match any participant (requires SPORTident station).
A comment can also be entered (free text).
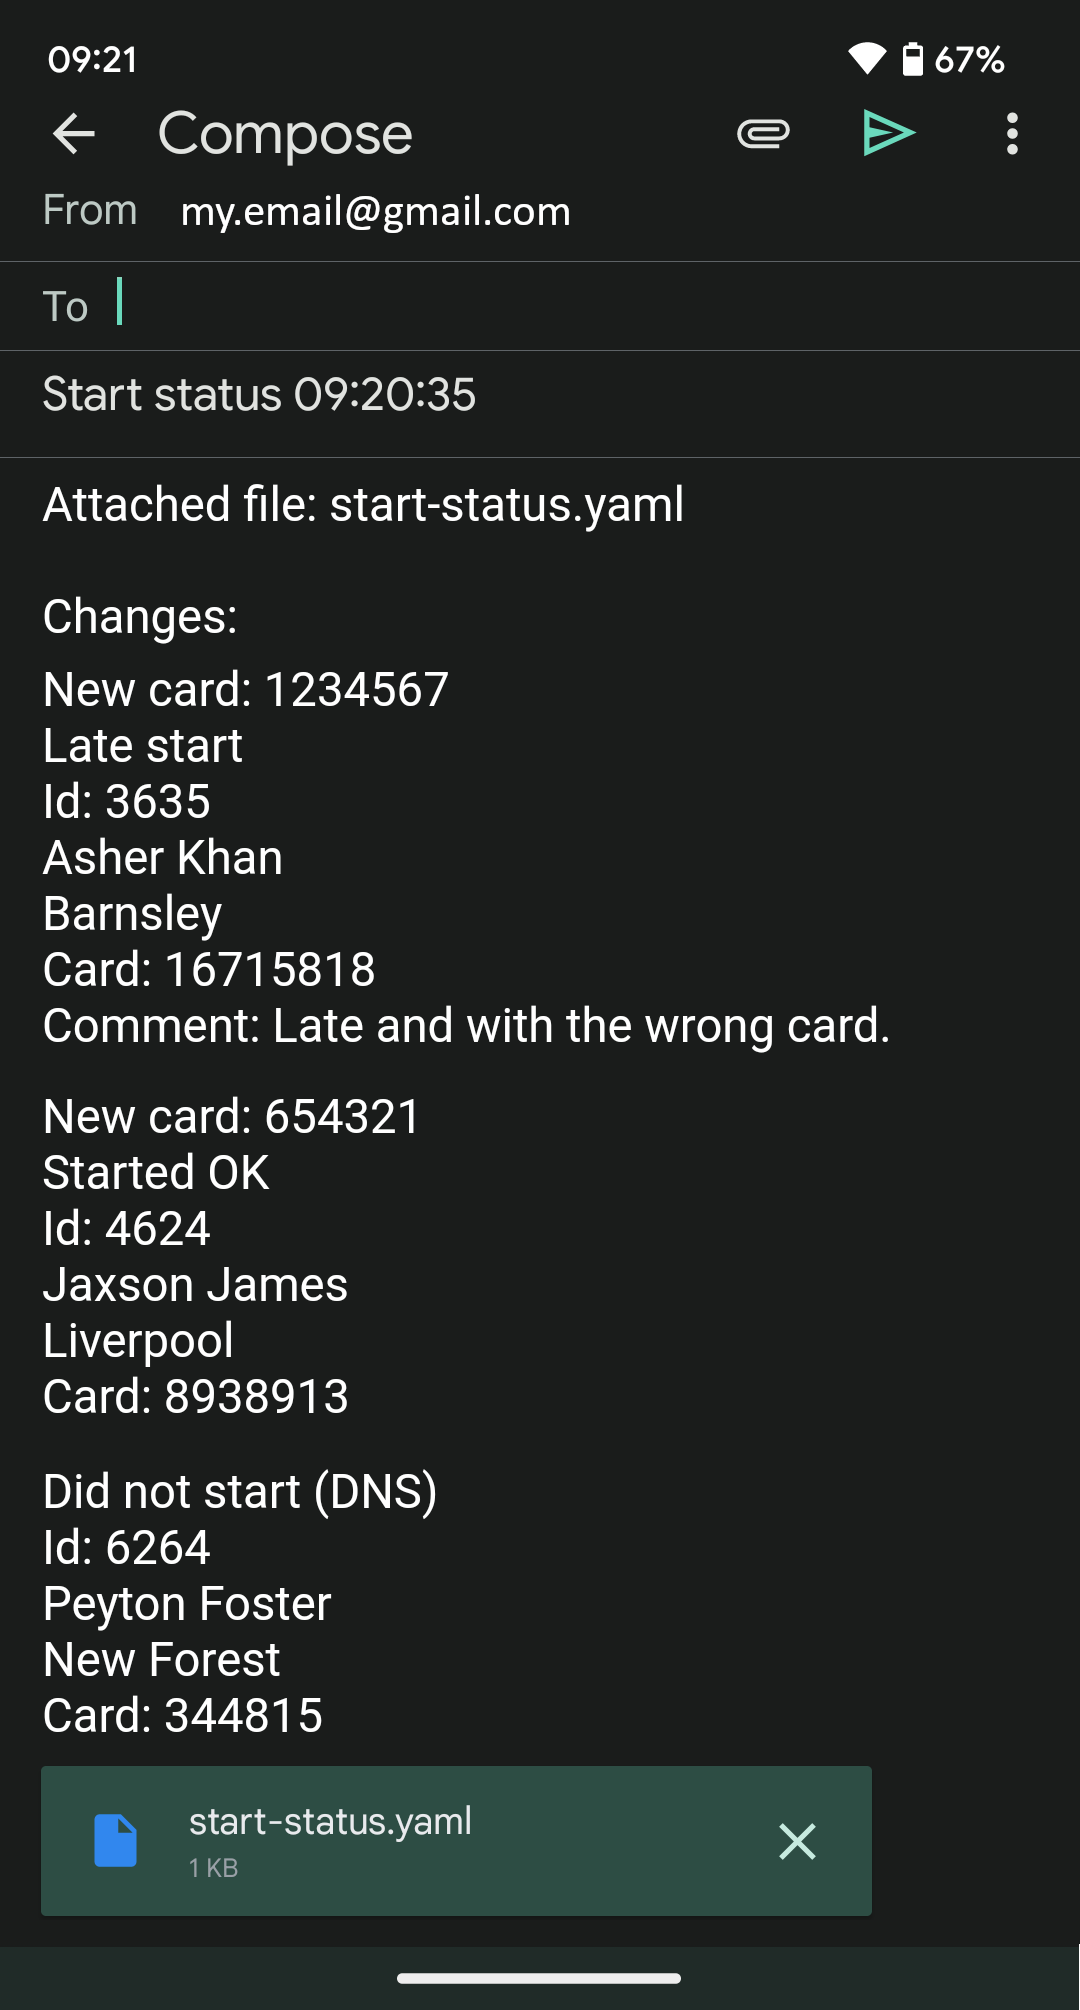
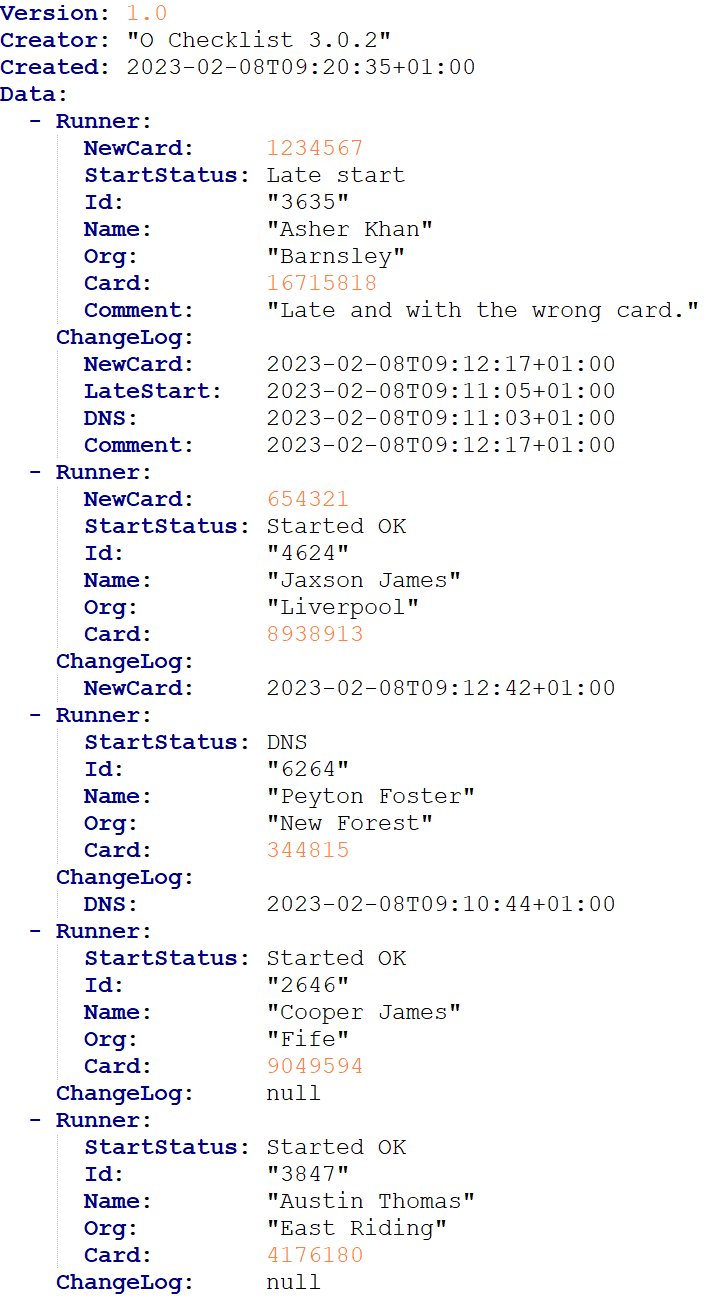
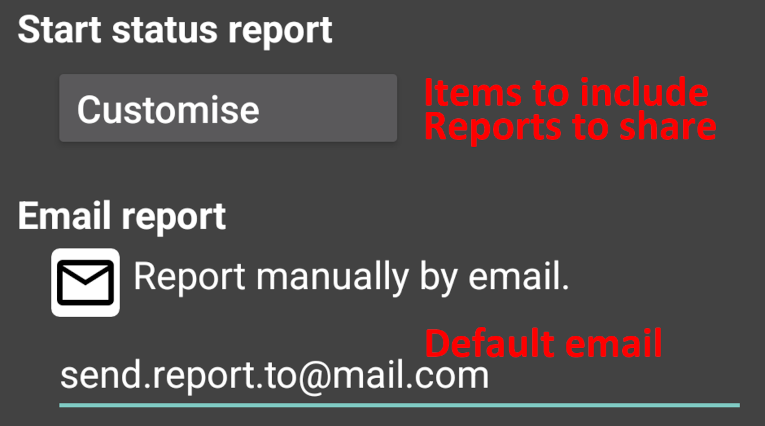
Start status reports
There are two types of start status reports:
- Text – Plain text report, which is inlined in an email message. Intended for humans.
- YAML – The YAML formatted report, suitable for computerised processing. This report is encoded
in the YAML data language and has this format.
The start status reports can be customised as described in the Settings section below.
Symbols:

Email text and/or YAML reports.

Upload YAML report to server.

Upload incremental YAML report to server.
The screenshots below show:
- The app.
- The message (Gmail) with the inlined report and an attached YAML file.
- The YAML file.
Settings
Time adjustment — The entered value is added to the current time:
- Display call up time: If participants are called up 3 min ahead of their start time, enter +3 min.
- Postpone start: If competition is delayed 30 min, enter –30 min to keep the original start times.
Start window — The duration of the Start window. Suggested settings:
- Interval start: At 1 min start interval and 3 start boxes, set Start window to 1 min and Time
adjustment to 3 min.
A Start window of 3 min would include all three start boxes and give additional time for tick off.
- Chasing start: Set Start window to 3 min and Time adjustment to 3 min (or, any other suitable
values).
Symbols:

Give a sound signal (a short double beep) when the start window moves forward.

Participants who have not been ticked off as started will automatically get status
DNS when leaving the start window.
SPORTident station

Give a sound signal (a few happy beeps) when a participant is automatically ticked off OK.

Give an audible error signal (a buzzing sound) when a participant has an unknown card or is outside the start window.

Check that card is cleared. This takes 1–2 seconds of extra time.
Optional features
The following features can be enabled or disabled.

Confirm manual status change (by tapping a participant) when the new status becomes
DNS (red), Lat start (orange), or, Reset (initial state, uncoloured).
Manually add new participant.
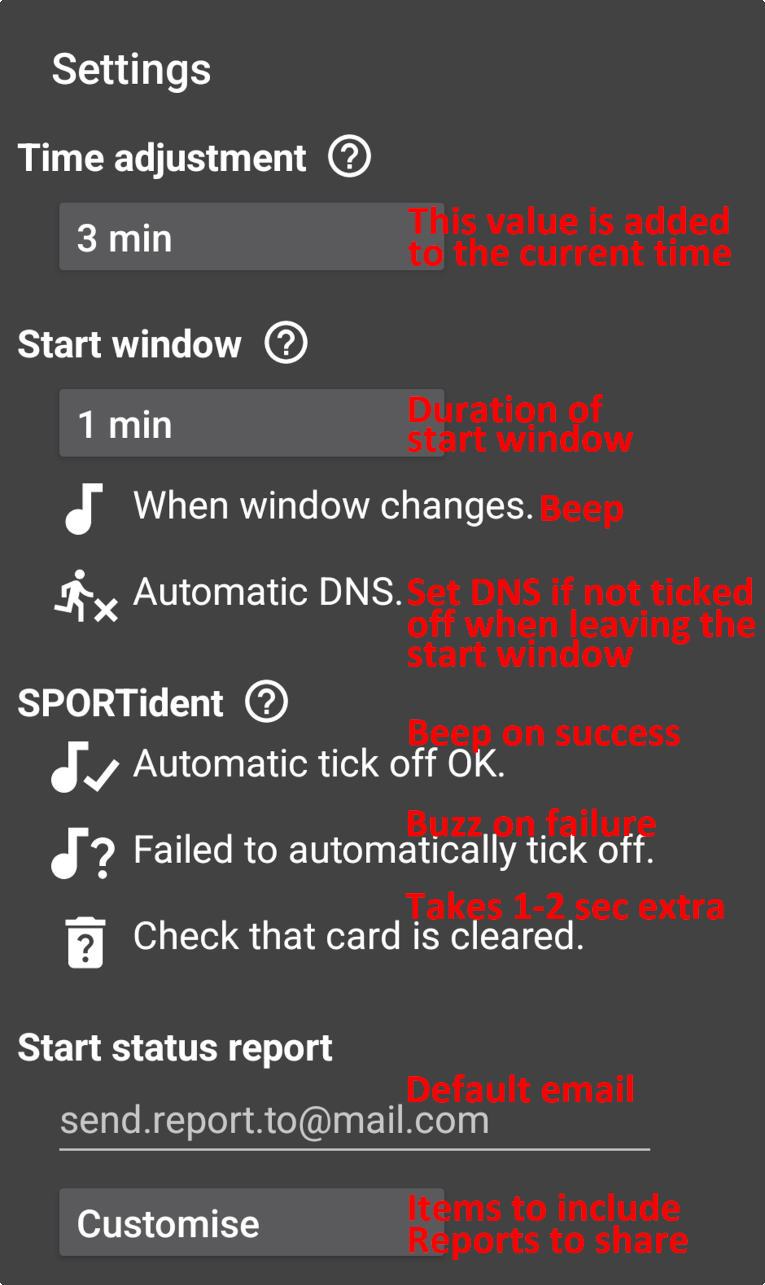
Start status report — There are two types of start status reports:
- Text – Plain text report, which is inlined in an email message. Intended for humans.
- YAML – The YAML formatted report, suitable for computerised processing.
The reports can be customised as described below. For convenience, a default email can be entered.
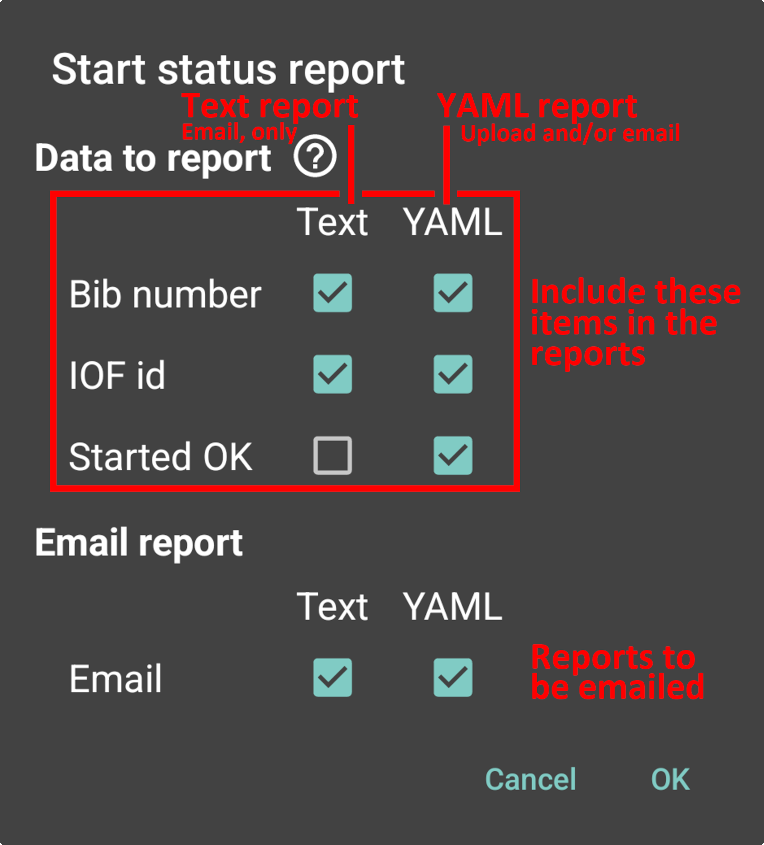
Customisation: Select whether to include the following data in the start status reports:
- Bib number – Participant's bib number (competition number).
- IOF id – Participant's id, specified in the imported XML file in accordance with IOF Data Standard 3.0.
- Started OK – Include participants with status Started OK that have no changes.
Uncheck to not report these participants; this can for example avoid that the plain text report becomes too extensive.
Select which start status reports that are to be sent by email:
- Text – Email text report.
- YAML – Email YAML report.
Upload to server — Upload start status YAML formatted file to server using POST or FTP.
The upload can be done manually, or, automatically every n:th minutes.
POST settings:
- Protocol – Select POST.
- Host – The server to which the file is uploaded. Android requires a secure connection https://…
- Header key and Header value – This key-value pair is added as an HTTP header
to the POST request. This can be used for authentication. Leave Header key empty to not add any header.
- Checksum – Generate a checksum (a hash value) for the YAML start status report.
The checksum is added as an HTTP header Content-Digest which can be used by
the server to verify the integrity of the YAML file (the report).
FTP settings:
- Protocol – Select FTP, SFTP (SSH FTP), or, FTPS (FTP Secure, using TLS and explicit security mode;
FTPS with TLS/SSL session reuse is not supported).
- Port – The port number to be used by the FTP protocol.
- Host – The FTP server to which the file is uploaded.
- Username and Password – FTP server login information.
- Directory/file – Where on the FTP server the file is saved.
The directory/subdirectories must exist on the server. Filename only, eg, start-status.yaml, places the file in the top directory.
Import start list
Workflow overview
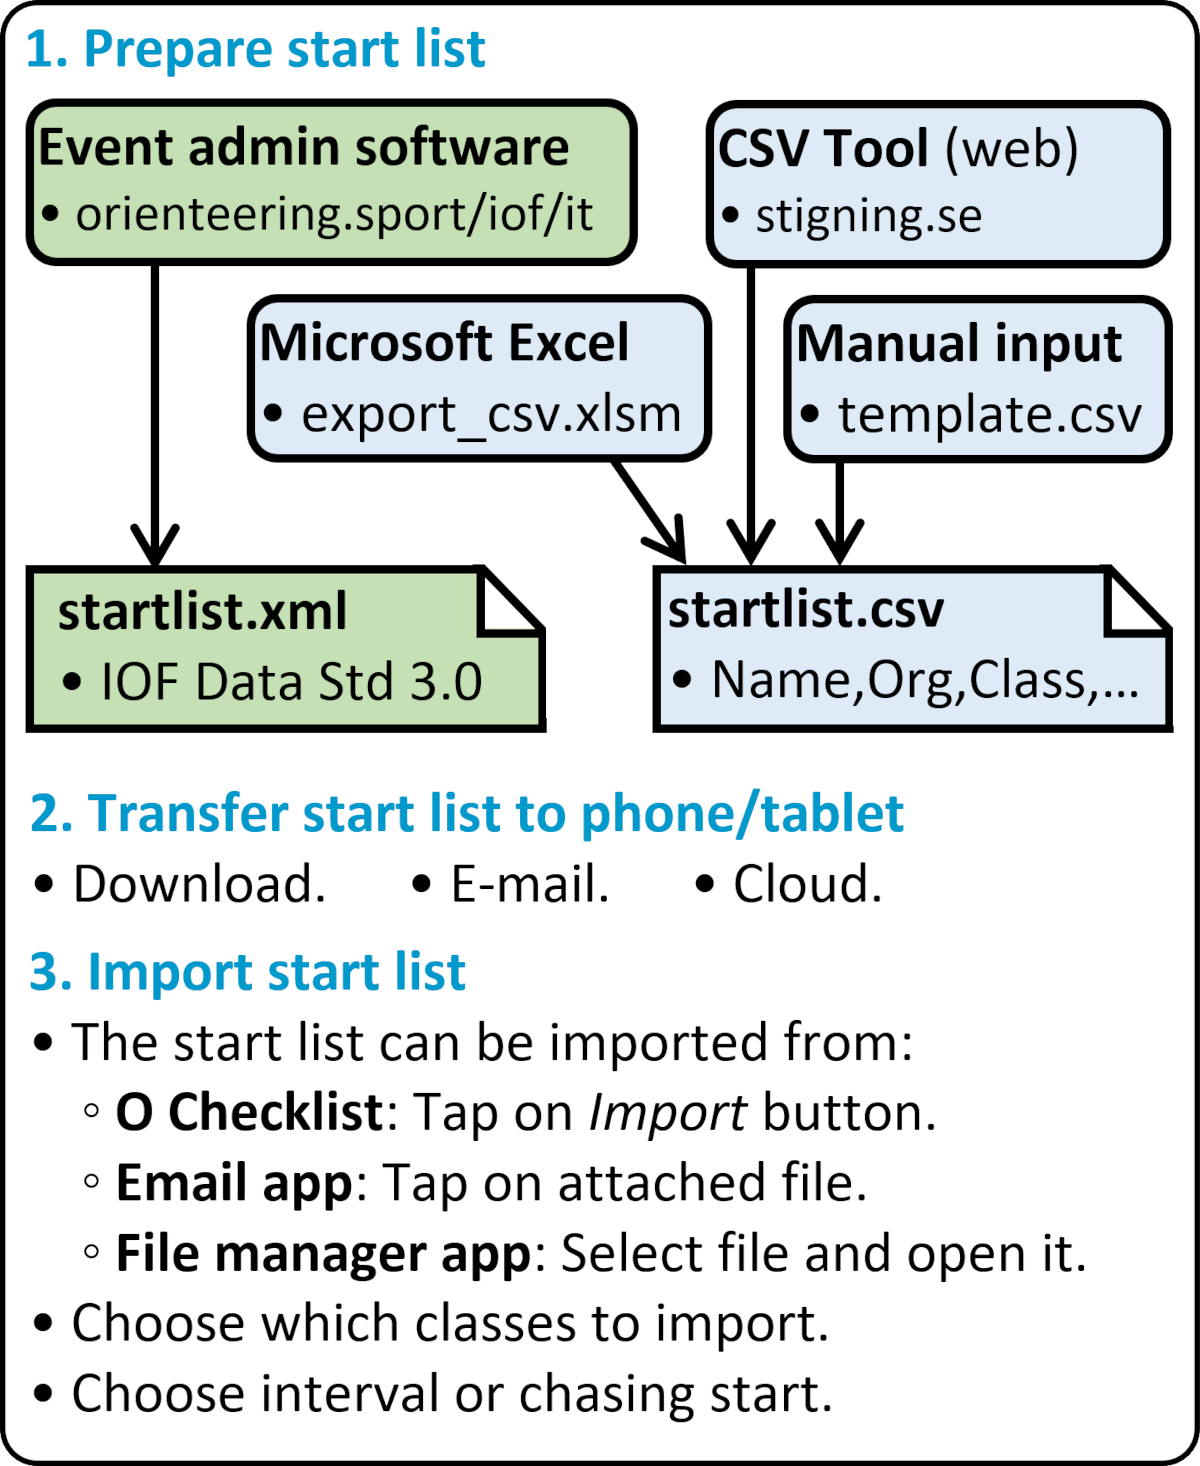
Prepare start list
Create the start list, either in XML format, or, in CSV format (Comma-Separated Values).
Transfer start list to phone/tablet
Transfer the file to be imported (the start list) to the device (phone/tablet). This can be done in
several ways, for example, by emailing or downloading the file.
Import start list
The start list can be imported from within O Checklist, from your email, or, through a file manager.
- O Checklist — Delete any previously imported start list, then tap on the Import button in the main window.
- Email — Tap on the attached file.
- File manager — Locate and open the file to be imported.
Optionally, use Open with to send the file directly to O Checklist.
During the import:
- If asked, choose to open the start list with O Checklist.
- Select which classes to import. Participants in these classes will be imported, only.
- Participants who lack start time will be imported.
Note: This is different compared to Start Clock.
- Select interval start or chasing start.
How to find the import file
- If the file has been downloaded, it is usually stored in Android's Downloads folder.
Use a file manager (for example, Files by Google, Total Commander) to locate it.
- If the file is stored in a cloud service (for example, Google Drive, Dropbox, Onedrive),
it may need to be exported to Android's file system.
Troubleshooting import
When tapping on an XML/CSV file, Android uses the file extension to determine that
the file is handled by O Checklist, and then sends the file to O Checklist. If there are several
apps that can handle this filetype, Android will ask which app to use.
If another app (not O Checklist) starts when you tap on the XML/CSV file, then that app
has been set as the standard app for this filetype. It could for example be the MS Excel app, an
office app, or any similar app. Go to Android's settings, select Apps, and tap into the
app that starts instead of O Checklist. Now clear this standard setting.
Note – This is a description of Android's handling of filetypes (MIME types),
which is used when opening a start list from an email app or a file manager.
It is not applicable when importing from within O Checklist (or, from a file manager
if Open with is used), because the picked file is then directly sent to O Checklist.
Supported file formats
- XML, in accordance with IOF Data Standard 3.0.
Does not support multiple contests in one XML file (multiday events). Filename must end with extension .xml (lower case).
- CSV, with the following comma-separated fields: Name*, Organisation*, Class*, BibNumber, StartTime*, ControlCardNumber, StartName.
Fields containing commas must be enclosed with quotation marks, for example, "Last name, first name".
Blank lines are ignored, comment lines start with // (double slash).
CSV file should be in UTF-8 format (good for åäöæøüáóñéèù…). Filename must end with extension .csv (lower case).
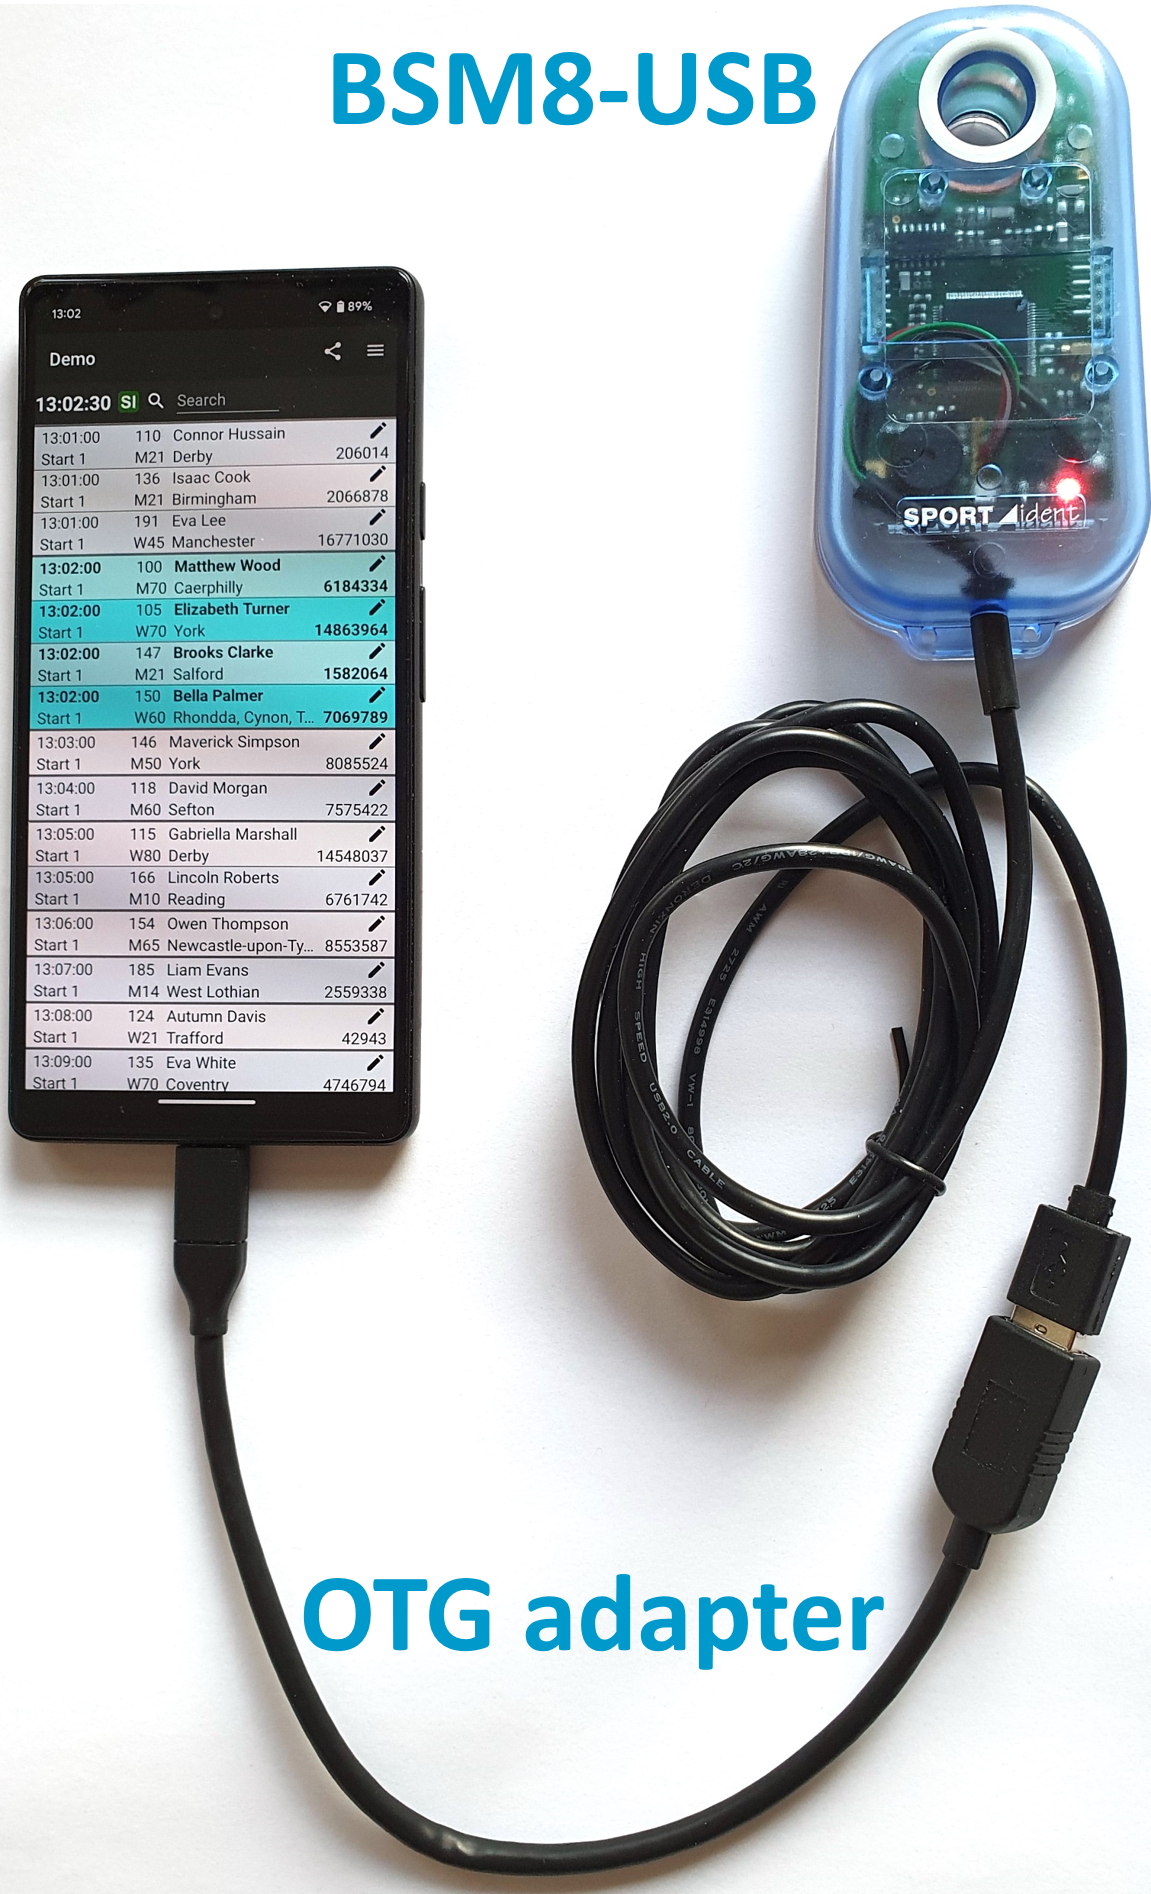
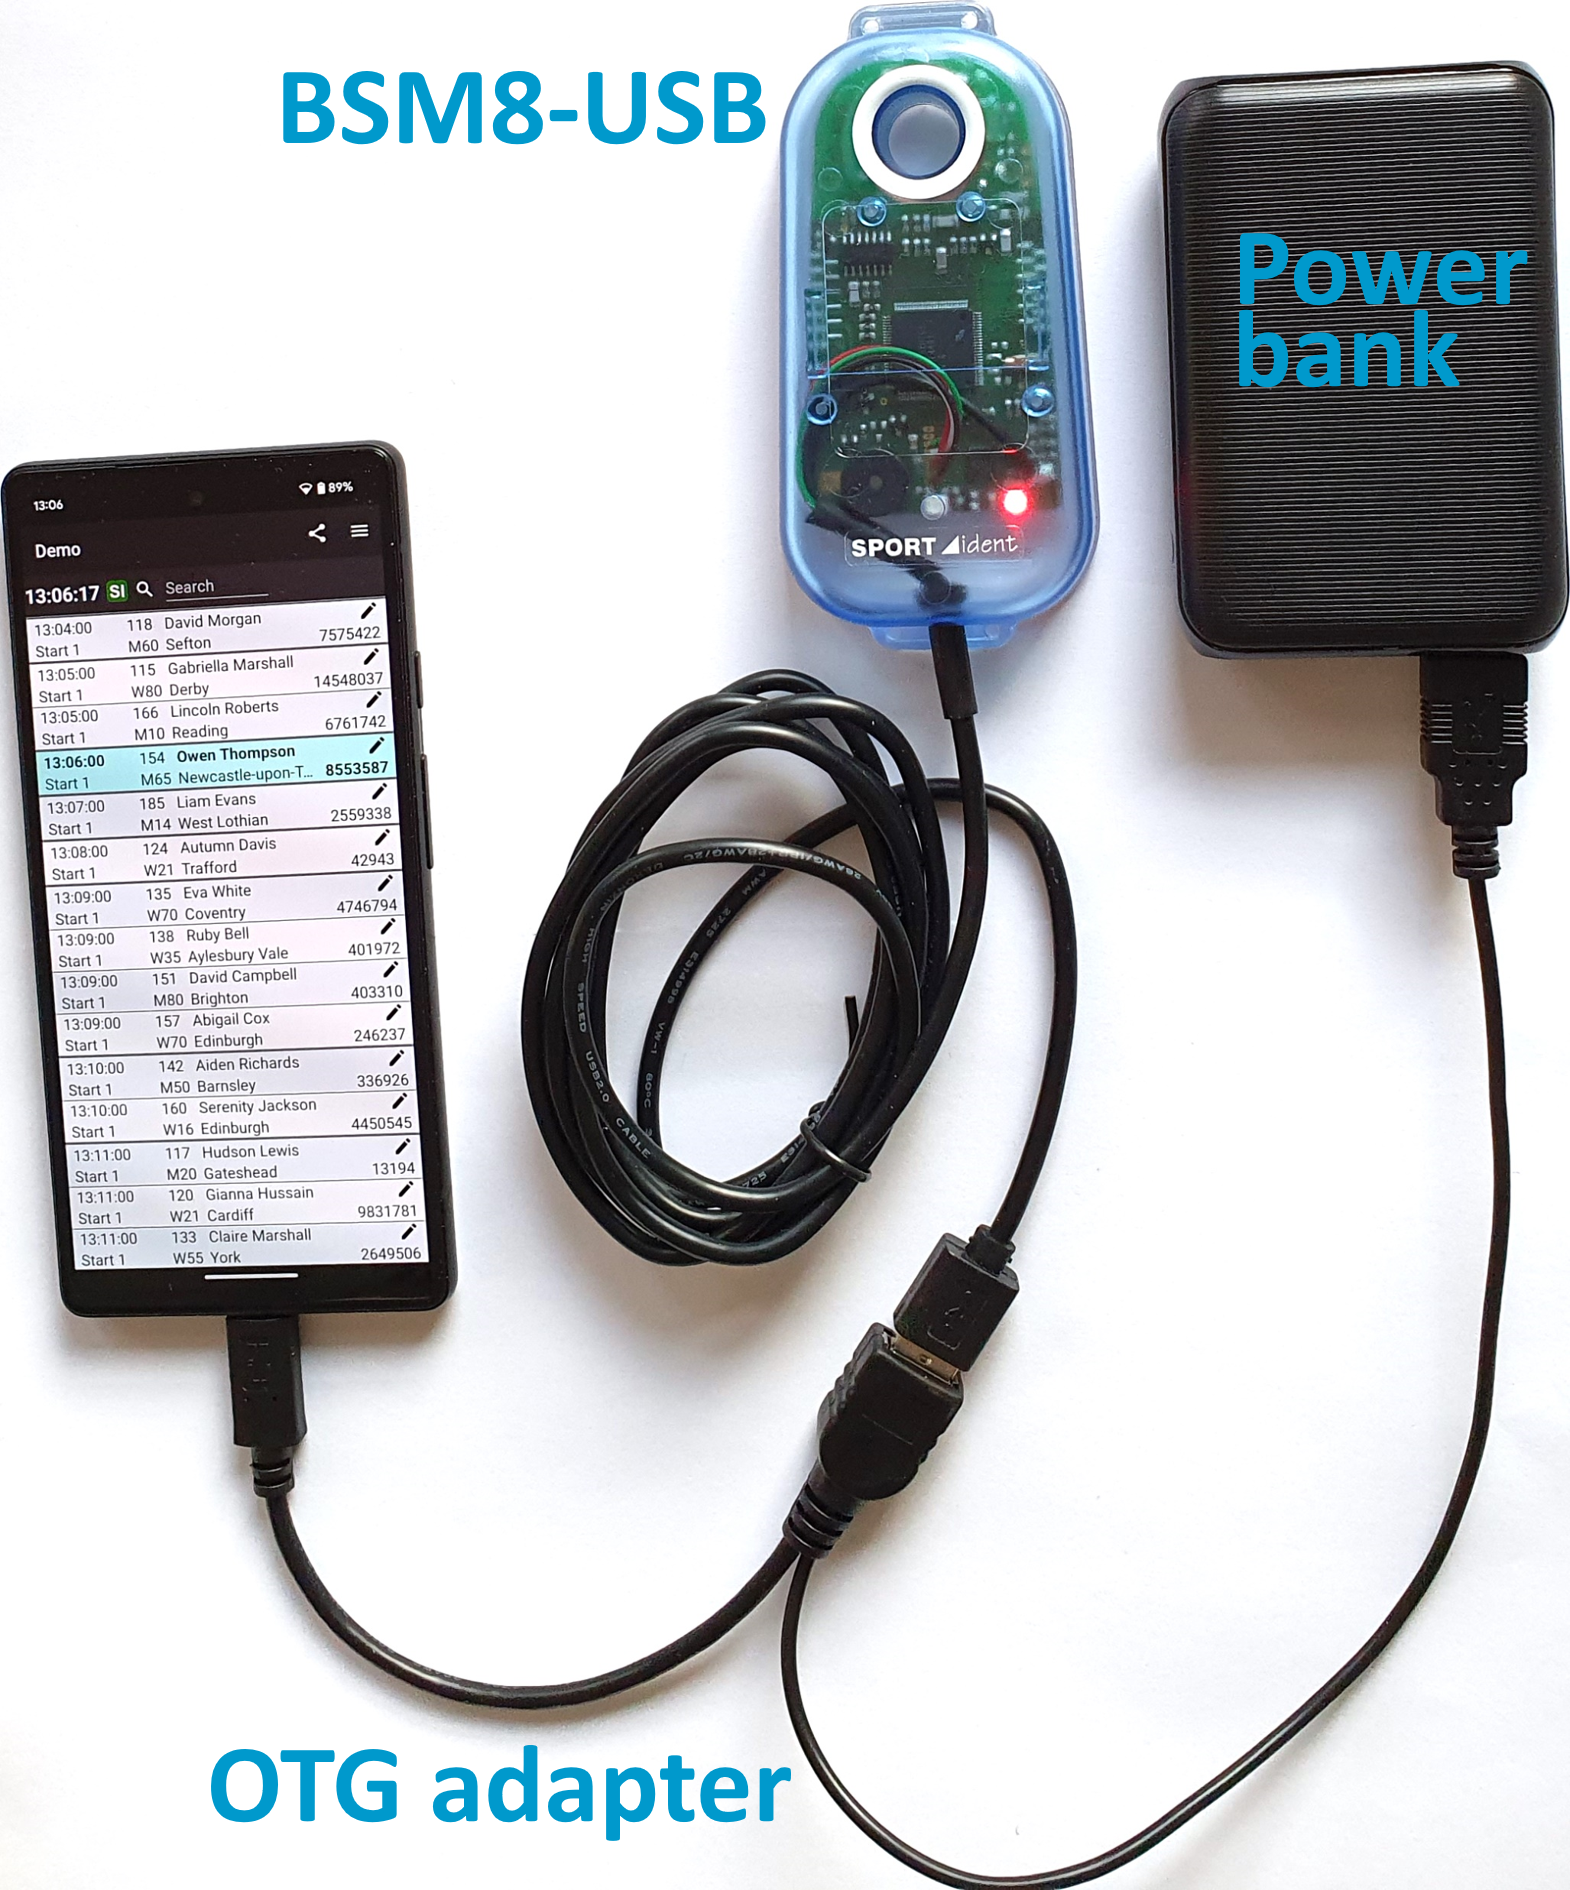
OTG setup
Use a USB On-The-Go (OTG) adapter to attach a SPORTident station to the phone/tablet (an ordinary USB cable does
not work). Note that the SPORTident station is normally powered by the host (the phone/tablet). To extend the
battery life of the phone/tablet, an OTG adapter with separate power cable for the SPORTident station can be
used.